


Enquire Form
Step-by-Step Thermoforming Workflow for Clear Aligners

A Practical Dental Lab Guide
Thermoforming process for clear aligners is the step where your aligner actually takes shape to deliver results. You can have the best treatment plan and perfect staging, but if your thermoforming is not okay, the aligner won’t deliver what it was designed to do. The whole story of the aligner material proves to be aimless if thermoforming goes wrong, and to be kept in mind that thermoforming clear aligners his is not just a “machine process.” It’s a precision workflow.
Clear aligners’ manufacturing process depends on thermoforming, and material skills. Combining the two gives the desired result. In this blog, we would be trying to give knowledge pearls on clear aligner thermoforming workflow to get beneficial output.
Let’s break it down step by step so your while thermoforming aligners, dental lab output stays consistent, accurate, and clinically reliable.
Why Thermoforming Matters More Than You Think
In aligner manufacturing, thermoforming directly affects:
- Fit and retention
- Force delivery
- Patient comfort
- Case predictability
Even a small inconsistency in clear aligner fabrication steps like aligner sheet heating temperature, pressure, or trimming can change how the aligner behaves intraorally.
That’s why standardizing your workflow is critical.
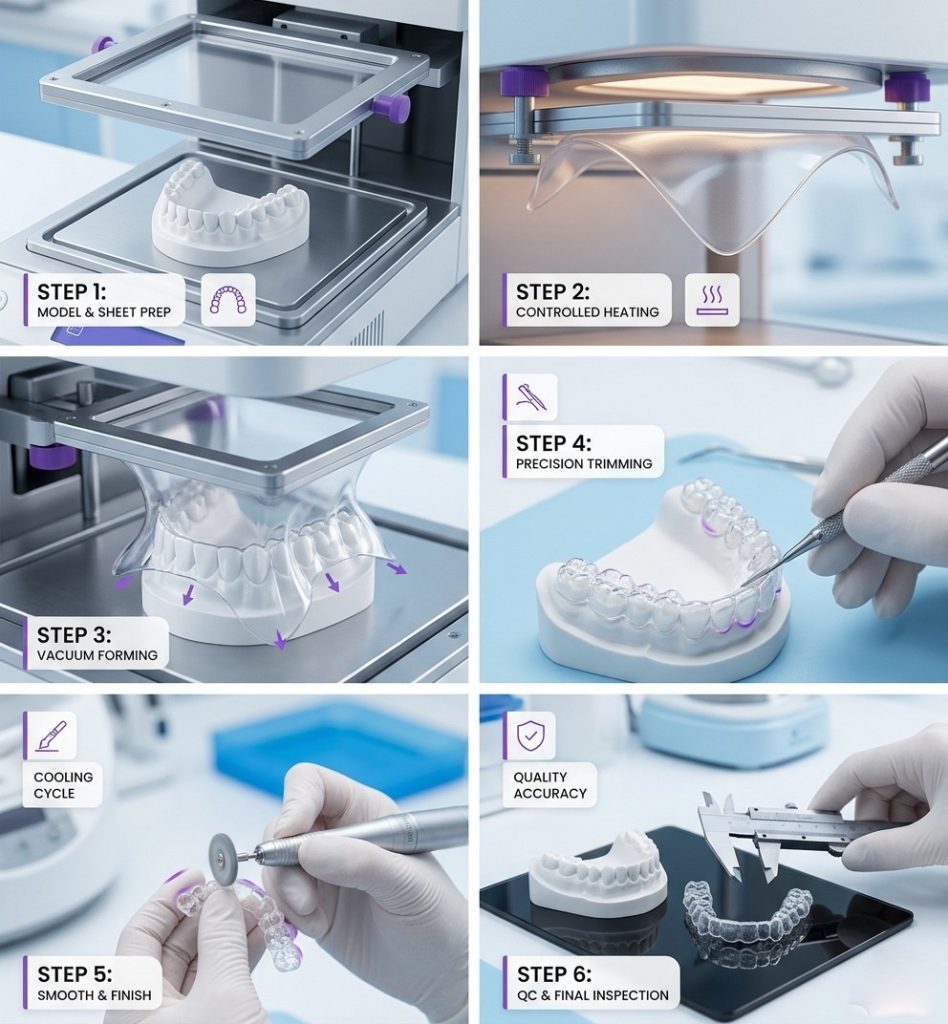
Step 1: Model Preparation
Everything starts with the dental models. If the model is inaccurate, your aligner will be too not perfect. It’s ironic that when an aligner fails, nobody checks the models.
What to check before thermoforming:
- No bubbles or voids in printed model
- Sharp and clean margins
- Properly cured (especially for 3D printed models)
- No warpage
Pro Tip:
Always ensure that models are completely dry. Even slight moisture can affect sheet adaptation during heating.
Step 2: Block-Out and Surface Refinement
Undercuts and sharp edges can distort the aligner or cause tearing during removal.
What labs typically do:
- Block out deep undercuts using block-out resin
- Smooth sharp line angles
- Light polish if needed
This step improves both fit and ease of removal.
Step 3: Sheet Selection
Material selection is not just about thickness. It defines force systems and wear comfort.
| PARAMETER | WHAT TO CONSIDER |
| Thickness | 0.5 mm to 1.0 mm depending on staging |
| Material Type | PETG, PU, Multilayer |
| Elasticity | Impacts force delivery |
| Clarity | Important for aesthetics |
Insight:
Multilayer sheets are increasingly preferred because they balance stiffness and flexibility, improving patient compliance.
Step 4: Heating the Sheet
This is where most variability happens.
Key variables:
- Heating temperature
- Heating time
- Distance from heating element
- If overheated → sheet thins out, loses force
- If underheated → poor adaptation, weak fit
Best practice:
Follow manufacturer-specific heating guidelines instead of relying on “visual sag only.”
Step 5: Thermoforming (pressure forming vs vacuum forming aligners)
Once heated, the sheet is adapted over the model using either:
- Vacuum forming
- Pressure forming
Pressure forming is generally preferred because it provides:
- Better adaptation
- Higher detail reproduction
- More consistent results
- Critical checkpoints:
- Immediate transfer after heating
- Uniform pressure application
- No delay (even 1–2 seconds matters)
Step 6: Cooling Phase
This step is often rushed, but it directly impacts final fit. To get desired coling effect, following practices should be followed:
- Allow full cooling before removing
- Avoid forced cooling (can cause internal stress)
Removing too early can lead to:
- Warping
- Distortion
- Poor retention
Step 7: De-Moulding
Careful removal prevents cracks and deformation.
Tips:
- Use controlled pressure
- Avoid excessive force
- Follow a consistent removal direction
- Poor de-moulding can undo all the precision from previous steps.
Step 8: Trimming and Finishing
This is where clinical usability comes in.
Trimming styles:
- Straight cut
- Scalloped (more common in premium aligners)
Finishing checklist:
- Smooth edges
- No sharp margins
- Proper gingival contour
- A well-finished aligner improves:
- Patient comfort
- Wear compliance
- Brand perception
Step 9: Quality Check
Before dispatch, every aligner should pass a basic QC.
| QC PARAMETER | WHAT TO LOOK FOR |
| Fit | Snug over model |
| Clarity | No haziness or bubbles |
| Thickness consistency | No excessive thinning |
| Edge finish | Smooth and clean |
Labs that skip this step often face remakes and complaints.
Common Mistakes Labs Make
Let’s be real. Most errors are not technical; they are process related.
- Inconsistent heating cycles
- Skipping block-out for speed
- Removing aligners before full cooling
- Poor trimming quality
- No standard QC protocol
- Fixing these alone can significantly improve output quality.
How to Standardize Your Thermoforming Workflow
If you want predictable results, treat this like a system, not a task.
What works:
- Create SOPs for each step
- Fix heating parameters for each material
- Train technicians on timing and handling
- Maintain machine calibration
- Use the same material batch for consistency
- Consistency is what separates an average lab from a reliable one.
In a Nutshell
Thermoforming is not just about shaping plastic. It’s about translating a digital treatment plan into a physical appliance that performs exactly as intended.
When done right, you don’t just deliver aligners. You deliver predictable outcomes. This is the reason, Taglus always encourages the users to follow the instructions mentioned with every sheet package to get the desired outcome without any glitches. To know more about the mistakes that dental lab makes while thermoforming aligners click here
Always remember, in this space, predictability and workflow technique sensitivity is everything.

Know More About Us
SignUp To Our Newsletter And Get To Know More About Taglus
Taglus is the global industry leader in the manufacturing of innovative clear Aligner and retainer thermoplastic sheets.

Copyrights@taglus-2026
*Taglus is a trademark of Vedia Solutions

Leave a Reply